Pages

Thursday, September 5, 2024

Learn how to use an old hardcover book for your junk journal!


Hello Crafty Friends!

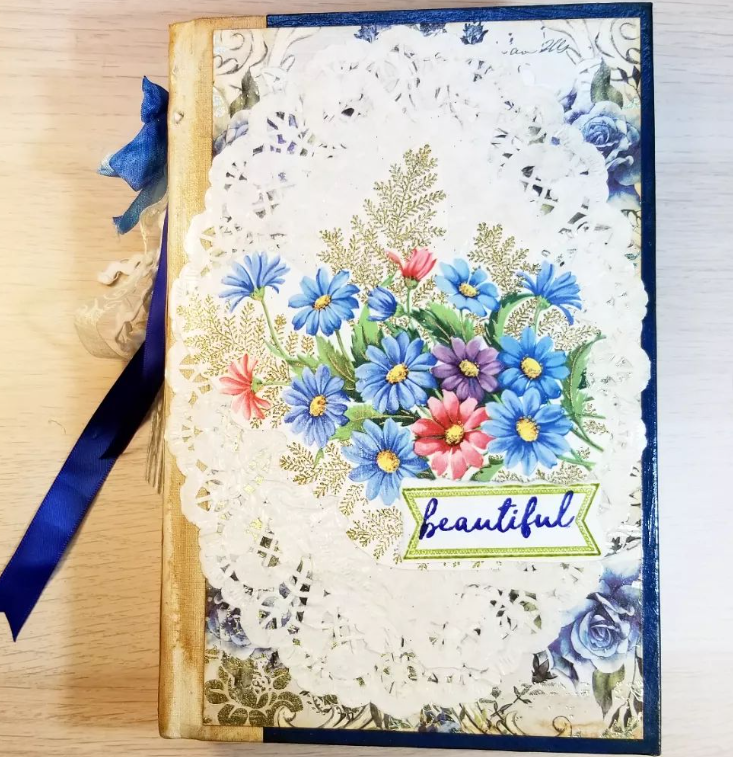
Are you interested in junk journals?  Perhaps you have made many or you would like to start and do not know where to begin?  Junk journals are fun to make and are a great way to create something unique.  I so enjoy sitting in my craft room and taking papers or other items that would possibly end up in recycling or (gasp!) a landfill then making something new with them.  It is very relaxing and sparks the inner child in me.


Sometimes the most difficult part of starting something new is the first step.  Several people have approached me and said "I would like to make a junk journal but have no idea where to begin" or, even worse say, "I would make a junk journal but it would probably turn out horrible".  Nope, I do not believe the second one.  The first statement is easy- I say let's go on this crafty journey together!


A few weeks ago I shared my first junk journal.  It still makes my heart happy.  A lot of love went into that journal and I am proud of myself for taking that first step and trying something new.  
Now I am doing a weekly YouTube Live at 10am AST/ 8am CST to walk through the steps to create your own junk journal.  


Last week I shared how you can take an old hard cover book and prep it for your junk journal.  I share tips that I have learned to help you turn your first (or second or third...) book spine into a great starting point!

You can join in on the Live every Sunday on my YouTube channel: @kathyjocrafts

Feel free to leave questions or comments on the YouTube channel.  Follow me on YouTube and join in on the creativity!

Have a happy, crafty day.

Hugs,

Kathy Jo


Monday, September 2, 2024

Learn how to tea dye papers!


Hello Crafty Friends!

I love tea dyeing papers.  It is such a fun process and the results are awesome.  I like to keep a stash of papers for my junk journals and, believe me, I use a lot of them!  The process is super easy and requires items that you already have in your house.

Yesterday during our weekly YouTube Live, I walked through the tea dyeing process.  We discussed what you can tea dye, different teas and their colors, how to prep the tea bath, how to prep your worksurfaces, how to dye, affects of time during the process, and fun tips to create more interesting details for your papers.


This video is prefect for all levels of a junk journaller.  Easy to follow and full of helpful information to help you create vintage, beautiful papers!

Check out a YouTube Live every Sunday at 10am AST/ 8am CST:  @kathyjocrafts 

Thank you for stopping by!  Have a happy, crafty day.

Hugs,

Kathy Jo


Monday, August 5, 2024

Create your own mini album using one 12 x 12 paper!


Hello Crafty Friends!

We all have scrapbook paper that we would love to use on a unique or special project.  Admittedly, I have a lot of treasured papers that are longing for use.  These papers are either "to pretty" to use or I bought them but have no idea how to incorporate them into a project.  

One day I grabbed one of those pretty papers and decided to play.  I ended up creating a sweet mini album with pockets- horizontal, side, and top opening.  Quick and easy to create, this project will have you making more than one!


On Sunday's weekly YouTube Live, I shared the project.  For the mini I used one of my favorite all time paper collections: Graphic 45's Nature Sketchbook.


After the tutorial video was completed, I finished the project by adding tags, little journal cards, and some ribbons.  It was a great project to use of some of my scrap pieces!


It is such a sweet mini and I love the finished results.  A perfect project for when you only have an hour or two to craft but want to feel like you finished a lot!  😁

Feel free to check out my other videos: @kathyjocrafts

You can catch the weekly lives every Sunday morning at 10 am AST/ 8am CST.  The videos are always available after.

Have a happy, crafty day!
Big hugs,
Kathy Jo


Sunday, February 18, 2024

Organize your mini cube inks- easy and inexpensive!


Organize your ink!

Hello Crafty Friends!


Are you looking for an easy and inexpensive way to organize your mini ink cubes?  On my YouTube channel I share how I organize my cubes.  My organization allows you to quickly find your cube colors, keep like colors together, and keep your lids/ink bases together!

So simple!  Check out the short video here.

Feel free to subscribe to my channel!  @kathyjocrafts


Thanks for stopping by!

Have a happy, crafty day!

Hugs,

Kathy Jo

Thursday, November 17, 2022

'Happy Birthday!' using newly released Postage Edge Shape Collection

Hello Crafty Friends!

Were you able to see all of the lovely projects using the new Postage Edge Shapes Collection?  The Intro Hop was on Monday and the Creative Team shared projects on Facebook, Instagram, and blogs.  You can see all of the projects on Facebook at the Amazing Paper Grace- Creative Encouragement Community.  Feel free to join the community to see and share your own projects using Amazing Paper Grace product.  Would love to see what you create!!

Today I would like to share a birthday card I created for a wonderful friend.  She is one of those special people that makes the world a better place just by being her.  I feel so fortunate to say she is my friend!  For her birthday I created a card using purple as that is her favorite color.

Her card was created using the newly released Postage Edge Shapes dies in square (S5-538):

...and circle (S5-539):


Card instructions:
  1. Die cut silver card stock using the largest postage square die.  If your silver is not heavy weight, die cut again in white.  Mount the silver onto the white and set aside.
  2. Die cut patterned paper using the largest non-postage square die.  Mount to the silver postage using double sided tape.
  3. Die cut purple cardstock using the circle postage die.  Mount to card front using foam tape.  Die cut a different piece of patterned paper using the circle die.  Optional: apply silver marker along the edge.  Mount to base using foam tape.
  4. Die cut white card stock using the next size down postage and circle die to create a frame. Mount to card front using liquid adhesive.

  5. Die cut Happy Birthday (S4-1206) twice from silver and white card stock.  Offset mount the silver to the white using liquid adhesive.  Mount to card front using liquid adhesive.
  6. Die cut purple foam using flower dies.  I used set S4-867 but Amazing Paper Grace has many lovely flower dies to choose from.  Cut several layers for each flower bundle.  Use a heat tool, hot foil platform or clothes iron to heat up and curl the flower petals.  Stack foam die cuts to create flowers.  Insert stamen and use hot glue to secure.  After cool, use cutter to rim underside of stamen and glue.  Die cut foliage from green foam and heat slightly.  Mount all to card front using hot glue.
  7. Create triple bow and mount using hot glue.
  8. Add half pearls or drops as desired.
  9. You can next either mount onto a white card blank or create an easel stand back.  The easel stand back will allow it to be a shaped card.

Product used:
Spellbinders (Circle Postage S5-539, Square Postage S5-538, Happy Birthday S4-1206, Flowers S4-867)
Paper (white, silver and purple card stock; coordinating patterned paper)
Foam (purple and green)
Stamen- white
Half pearl drops
White ribbon
Adhesive: liquid, double-sided foam, double-sided tape, hot glue

I do hope you enjoyed the projects!  Thank you for stopping by!  Have a happy, crafty day.

Follow me on Facebook!
Follow me on Instagram!
Follow me on YouTube!

Hugs,

Kathy Jo


Monday, November 14, 2022

New Release! Postage Edge Shapes Collection!

 
Hello Crafty Friends!!

It is another exciting day here: a new collection release!  The new collection is Postage Edge Shapes and is designed by Amazing Paper Grace for Spellbinders.  This versatile collection is perfect for holiday cards, scrapbooking, junk journals, any occasion cards...well...so many crafty projects!  I think the collection is a must have.  

The lovely postage edges made me think of the upcoming holidays and the cards we receive.  The edges remind me of the envelope stamps and all the cards we receive from loved ones over the holidays.  I made two holiday projects using the sets: a holiday card and a treat box.

Today's creations were made with dies provided by Amazing Paper Grace.


My Projects for Today
First, I created a holiday card.  The primary set used was the Postage Ovals die set:
With a little help from the Postage Rectangle die set:
I created a tent fold ivory card base.  Next, the largest rectangle was used to die cut gold card stock.  Ivory card stock was dry embossed using the Holly Flourish folder and then die cut using the largest rectangle (non-postage edged) die.  Both were mounted to the base.
The largest postage oval die cut pink card stock.  More ivory was embossed and then die cut using the largest non-postage die.  The process was repeated with the next smaller oval set except gold paper was used with the postage die.  The next set smaller using green and ivory but the ivory was not embossed as it was used with the sentiment (from stamp set STP-150).  They were mounted to the base using foam tape.
The poinsettia and flourishes (DOMAPG-OCT22) were die cut and mounted.  I kept the pieces flat for easier mailing, but you can easily create 3D die cuts.  The die cuts were mounted as shown:
The finishing touch was a triple ivory bow.

The second project is a sweet little favor/gift box.
I could have used small gift bags for this project but instead I used the Favorably Simple Gift Box (S5-259) designed by Amazing Paper Grace a few years ago.  The Postage Ovals fit perfectly on the box.
I die cut Kraft card stock using the box die set.  After creating the box, I die cut pink card using the two smallest postage dies.  Ivory card was dry embossed and die cut using the second smallest oval die.  They were mounted to the base using double side tape and foam tape.
I cut more of the poinsettia using gold and ivory card stock then mounted using foam tape (see above.)  The smallest oval was used to die cut ivory card and gold card stock.  The sentiment was stamped onto the ivory.  The two were adhered to each other (slightly offset) and then a hole punched.  Twine was assembled.  An ivory bow was glued to the top of the box and then the sentiment was mounted.
Wee gems were adhered as shown and the favor box was complete.  Isn't it the cutest?
The project pair was a fun set to create and the results were beautiful.  The postage edges really added gorgeous and vintage vibes to the projects.

The Postage Edge Shapes Availability:
These dies and plates are available from Spellbinders right now! Click here: The Postage Edge Shapes Collection.

Supplies:
The Postage Edge Shapes Collection - Postage Edge Ovals (S5-548), Postage Edge Rectangles (S5-540)
Other Spellbinders product- Poinsettia dies (DOMAPG-OCT22), Holly Flourish Embossing folder (SES-046), Favorably Simple Gift Box (S5-259), Seasonal Labels Motif stamp set (STP-150)
Card stock:  pink, ivory, gold, green, Kraft
Black Ink
Ivory ribbon, twine
Wee gems
Adhesive: liquid, tape, foam tape

For more Postage Edge Shapes Collection Inspiration

Visit each Creative Team blog linked below for their take on creative paper crafting ideas using The Postage Edge Shapes Collection.

I do hope you enjoyed the projects!  Thank you for stopping by!  Have a happy, crafty day.

Follow me on Facebook!
Follow me on Instagram!
Follow me on YouTube!

Hugs,

Kathy Jo

Thursday, November 10, 2022

A Festive and Rustic Noel!


Hello Crafty Friends!

November is here so Christmas card creating is in high gear. Luckily Amazing Paper Grace has wonderful holiday die and stamp sets to create holiday cards. The Noel Mini Slimline Frame Etched Die set (S5-535) was the primary set used on my holiday card.

I also used the sprigs from the Winter Label Motifs Etched Die set (S4-1240).

The Noel card is full of festive fun from the swirling Noel die to the holly leaves and sweet poinsettia. Let’s dive into the instructions:

1- Create a top fold 4.25 x 5.5 card base from red card stock. Mat white and wood patterned papers to the base using double sided adhesive tape.

2- Die cut the outer frame using white card stock. Die cut the frame die with the polka dot die using red card stock. Mount the red die cut to the white using either double sided adhesive tape or glue. Mount to card base using foam tape.

3- Die cut the inside frame using white card stock. Die cut Noel using red card stock. Die cut two of the scrolls using wood patterned paper. Mount the Noel and scrolls to the frame using glue. Apply foam tape to the back middle only. Apply glue to the top and bottom only. Mount to the card base making sure to press down on the top and bottom edges.

4- Die cut the outer holly (quantity 2) and poinsettia (quantity 4) frames using wood patterned paper. Die cut the holly using green card stock. Die cut the poinsettia and single holly berry using red. Die cut the poinsettia centers using gold. Die cut the sprigs as desired. Assemble the leaves and berries using glue.

5- Use foam tape to mount the holly to the center of the top and bottom of the frame. Use glue to mount the poinsettia and sprigs.

6- Apply clear color drops as desired. (I added the drops to look like snowflakes had melted on the wood.)

7- On the inside of the card I used a stamp from the Seasonal Label Motifs set: "Best Wishes for a holiday that outshines them all".

The card is easy to mail and is rustically festive.  

I do hope you enjoyed the card!  Thank you for stopping by!  Have a happy, crafty day.

Follow me on Facebook!
Follow me on Instagram!
Follow me on YouTube!

Hugs,

Kathy Jo

Related Posts Plugin for WordPress, Blogger...