Pages

Wednesday, January 30, 2013

My friends are crafty

Once a month some of us crafty girls get together and make cards.  Prior to the meet, we each design a card and then make kits for each person attending.  In the kit is enough material for each person to make two copies of your card.  We also require that both of your cards must be made in under an hour.  It is a fun get together and we always learn something new.  We met on Sunday for another crafty afternoon.  I would like to share my friends' cards with you all...

The first card was designed by Janice.  She is our Gamsol gal, our House Mouse Maiden, our Coloring Comrade.  It is a great card and we learned a quick and easy way to stack stamp!

She cut three pieces of ivory paper that were center stacked on top of each other (secured with temporary tape) and then stamped with Tim Holtz's stamp set Urban Grunge in inks Tea Dye, Bundled Sage and Walnut Stain.  After stamping we framed each ivory square with brown cardstock and mounted it on ivory cardstock.  Three progressively smaller pearls were added.


What a card!  It can be masculine, feminine, used for birthdays or just a note to say hi.  Virtual high five to Janice for this lesson learned!  Cannot wait to design cards using this stack stamping method.

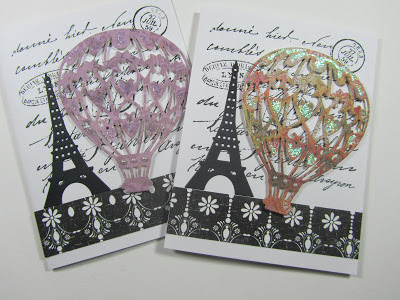
Next up was Val:  Our Crafter Extraordinaire, our Die Cutting Queen, our Renaissance Woman.  Her cards were O-La-La Lovely.  The Eiffel Tower is such a cool die and the hot air balloon die is on my wish list!  The layout is just perfect and happy!


Rebecca was next.  She is our Fancy Folding Femme, our Creative Cutter, our Design Diva.  She did the same layout for both cards but used two different colors.  It was a quick card to assemble but it does not look like it.  (We may have to change her nickname to Fancy Cutter Diva.)  And the colors...I can't pick out which I like better!  Both are so sweet.  Of course her butterfly die steals the show on this showstopping card.


Thanks, Ladies!  Looking forward to the next meet!

Interested in seeing more cards?  Hop on over to these blogs:
Janice: http://janicenicholson.blogspot.com/
Valerie:  http://valeriewilson.blogspot.com/


Tuesday, January 29, 2013

One pocket card- two different designs

I made two pocket cards over the past week- one was made using Graphic 45 paper Birdsong and the other was made using Hero Arts stamp Silhouette Vines and Basic Grey paper Boxer. Both are in an oriental type of style but look totally different. I enjoy making pocket cards because they are an interesting take on a card and the back of the insert can hold a gift card. A nice way to present a gift card.

The first is the Birdsong (my favorite paper!) pocket card. Surprisingly, I did not use a stamp and the only time I used my Cuttlebug was for the top of the card (Sizzix Ornate). Materials used: Graphic 45 8x8 pad Birdsong, Sizzix Ornate, black cardstock, ivory cardstock, gem flourish, Reflections lace trimming, fabric flower, gold calligraphy pen, Stickles Crystal and black gems.


The next card is an identical layout but different materials.  Hero Arts stamp Silhouette Vines was stamped in Majestic Blue.  Other materials used:  Spellbinders Labels Twenty Five (S5-077), Classic Ovals (S4-110), Sizzix Ornate, kraft cardstock, ivory cardstock, red gems, gold metallic pen, blue cardstock, Basic Grey Boxer, sheer ivory ribbon. 


Thanks for stopping by! Happy crafting, All!

Monday, January 28, 2013

More signs you are addicted to paper crafting...

22. You are kinda bummed that you can't dry emboss tortillas.
23. You run out of tape for your tape gun and it takes a few moments to remember how you taped B.G.
24. You refer to the time before you bought your tape gun as B.G.
25. Your dream craft giveaway: a free trip to CHA!
26. You keep a basket of empty toilet paper rolls in your bathroom.
27. Your motto: a card without Stickles is like mac-n-cheese without the cheese.
28. The only available storage space left in your craft room: the ceiling.
29. You refer to your local craft store as "your dealer".
30. You carry a list of all your Spellbinders and Tim Holtz ink in your purse so that you do not repeat purchase...
31. ...you also know most of your friends' Spellbinders.
32. You do not have "too much ribbon" but "improper storage".
33. You actually believe number 32.
34. When Michael's has 50% off coupons, you print out two: one for today and one for when you just "happened to be driving by".
35. You save those little hex angle tools from "assembly required" furniture kits...perfect for a Man Card.
36. You have spent two hours in a craft store and not realized it.
37. You know when the sunlight is perfect in each room of you house for the natural light shots of your crafting projects.
38. On April Fool's Day last year you looked at your husband seriously and said "You know, I think I finally have enough crafting supplies."
39. On April Fool's Day this year you plan on saying "My craft room is too big.  Feel free to use the closet for your clothes."

For the first 21 signs refer to my blog entry: http://daisysanddaffodils.blogspot.ca/search?updated-min=2012-01-01T00:00:00-08:00&updated-max=2013-01-01T00:00:00-08:00&max-results=4

Saturday, January 26, 2013

Sweet Monkey Cards- Here's a hug, Love you this much

I am not monkeying around when I say this monkey stamp is just too sweet!  So sweet that he was used on two cards right away.

The first card is for my best friend, Kim.  A long distance hug from me to her... and hopefully seeing him will make her smile.

 Front of card- the radius edge was created by tracing a cd


 Inside of card 

 
__________________________________________________
 
 The next card is for my husband.  This could be a Valentine's Day card or just a card to let him know I am thinking of him.  Same sweet monkey...different message.  


Have a good weekend, All!

Wednesday, January 23, 2013

Smart money ideas for crafters...and non-crafters!

We have all been there: went to a craft store and spent more than we had anticipated. Or, we find something in our craft room that we bought last year that had not been used. Sometimes I feel guilty for spending money on something that I had not used or I am frustrated for being so disorganized that I misplaced an item in my craft room. Today’s blog will cover the first topic- smart spending and saving ideas for crafters. Many of these money ideas can apply to other money spending/saving areas of our lives, too. As an important note- the Smart Cookies provided some of the ideas below or were the seed for some of the ideas. A good resource…you must look them up…well, after you finish the list below, of course!  I will add (SC) behind a statement if it came from them.
 
Before you read on, just remember that being smart with your money is not the same as being cheap. (SC) Think about that statement for a moment. Now let’s get some smart money ideas going.
 
  1. Make a wish list of items you would like with their respective prices. Keep that list with you. This list will be handy since it will be your list of goal items to save for . It is a good list to carry with you. Next time you consider buying a craft item, look at your list. Would you rather buy the item or items in your basket or save for an item on your wish list? (SC)
  2. Before heading to a craft store, make a list of what items you are picking up/looking for.  Determine your spending limit ahead of time.  If you can bring that amount in cash, do so.  Paying with credit can sometimes make it too easy to overspend.
  3. Look for coupons for the store you are heading to or for product you are considering purchasing.  Using coupons can save significant money.
  4. Remember: just because you have a coupon or just because an item is on sale does not mean you need to buy it.  Look back at your list in item 1, if that is helpful.
  5. Start a money jar or envelope to save for shopping.  Saving your money will ensure that you will not be in debt (as in using a credit card instead of cash) and the cash will make you more mindful of each item you purchase.
  6. Before you approach the cash register: go through your basket at least once.  Look at each item.  Do you see yourself using it within the next month, two months, six months?  If not, you may want to reconsider that item.
  7. Try to avoid paying full price at the chain stores such as Michael's, Hobby Lobby and Jo Ann Fabrics.  They usually have coupons available.  Some places have a very large mark up on product because they know that most consumers use coupons.  Better yet, buy from a local craft store- their prices can be significantly lower than places such as Michael's.
  8. Look for local "what's old is new again" sales.  The sales  may occur at local craft stores, churches, rentable activity rooms, etc.  The sale items are from local craft stores or fellow crafters.  You can find wonderful gently used (and new!) crafting supplies and the prices are usually very good.  (I keep a crafting money jar all year to save for a local used craft sale every January.  It is a fun time and the product I pick up is amazing!)
  9. Check Kijiji or Craiglist for crafting product.
  10. Borrow stamps, dies, etc from fellow crafting friends.
  11. Consider online buying from sites such as ebay or Amazon.  Combining your order with friends can also reduce shipping charges.
  12. Go to second hand stores for product.
  13. Post holiday sales can be a source of product to use on future projects.  For example, post Christmas sales usually means inexpensive red, white and gold ribbon or paper for Valentine's Day.
  14. Try to avoid buying ribbon on small spools.  Local sewing stores sell beautiful ribbon at better prices.  I have saved quite a bit buying at sewing stores...especially when they have their ribbon on sale.
  15. Think about alternative materials.  For example, I used red velvet paper (kinda pricey!) for poinsettias on my Christmas cards.  The cards looked lovely but I could not help but wonder if there was a better source for velvet.  After Christmas, wide rolls of velvet ribbon was on sale at a local sewing store.  I bought a 42 meter roll of velvet ribbon for the price of two sheets of velvet paper!  I can emboss it and cut it with no problem.  Score!
  16. Go through your current crafting supplies.  Are you not using an item and you do not think you will any time soon?  Gather up those unwanted items and post it on Kijiji or Craigslist.  Or, place those items in a "what's old is new again sale".
  17. Don't be afraid to used that "pretty paper" or ribbon.  I finally broke myself of that habit.  I had an 8x8 pad of Graphic 45 Birdsong hanging in my craft room that I refused to use.  The paper was so pretty that I was apprehensive to cut it.  I finally tore sheets out of that pad two weeks ago and have used it on a new project.  I am so glad I did!  The paper looks so nice on my newly recovered trinket box.
  18. Use your paper wisely.  Do you stack die cut paper on your cards or paper projects (such as the bunny stamp on my post yesterday)?  I may have stacked the stamped bunny on the brown My Mind's Eye paper, but not until after I cut out one of the hearts from the brown paper! No one will see the cut out heart and I saved some paper for a future project.
  19. A creative wedding card idea from a friend of mine: she cut out the couple's name and the wedding date from the wedding invite and then she used those cut outs on the wedding card.  The card looked so pretty and the couple was happy with the creative and thoughtful wedding card.  She is one smart and creative crafter!
I hope the above tips and ideas were helpful.  We are human and sometimes get weak when we walk into our favorite crafty store...but we can be smart and save for bigger ticket items or future sales.
 
Be smart!  Be crafty!  Be happy!

Tuesday, January 22, 2013

Cute Bunny Happy Valentine's Day card

A cute bunny stamp and My Mind's Eye paper pad "Love Me" were used on this Valentine's Day card.  The bunny stamp is just adorable.  I probably could have left the stamped image as is but I wanted to really doll up the bunny.  She has a little pink bow, chalky pink cheeks, white flock on her tail and Patina Stickles on her heart.  How could someone not accept the heart of this wee bunny?


Materials and tools used:
  • Brown cardstock
  • My Mind's paper pad Love Me
  • Ivory ribbon
  • Bunny with heart stamp (Michael's)
  • Spellbinder's Labels Eight (S5-019)
  • Radius corner punch
  • Three crystal gems
  • White flock
  • Patina Stickles
  • Mini pink ribbon
  • Two brown metallic pearls
  • Happy Valentine's Day Stamp
  • Spellbinder's Classic Hearts S4-136
  • Pink chalk
 
This card is submitted in the Just the Quietfire Creations Queen of Hearts Challenge:
 
 Little Scrap Pieces Be My Valentine Challenge: http://littlescrappieces.blogspot.ca/2013/02/be-my-valentine.html


Monday, January 21, 2013

Challenge card- Labels Seven S4-231 and the color purple

Bonjour!

I set a challenge for myself over the weekend.  The challenge was to make a card with a tool and a color I hardly use.  After going through my Spellbinder's, the Labels Seven popped out at me.  The Spellbinder's die set Labels Seven (S4-231) is a cute set but everyone I know who sees it or has it can only think of making an "open book" out of it.  It does look like an open book but I wanted to try something different with it. The color choice was easy: I hardly ever use purple. 

Here it is...my first challenge card of the year: "Labels Seven Purple card"!

Really love the Just Rite Fronds Background stamp! 

  
Just Rite Bonjour label with Spellbinder's Label Six


Materials and tools used:
  • Just Rite Elegant Fronds Background stamp CL-03695
  • Just Rite Bon Voyage CL-02185
  • Spellbinder's Labels Seven S4-231
  • Spellbinder's Labels Six S4-230
  • Recollections Lace on a Roll, black
  • Martha Stewart Trellis punch
  • Copic marker Amethyst V17
  • Stickles Star Dust
  • Vellum paper
  • Prima Moulin Rouge 6x6 paper
  • Cardstock- black, white, metallic blue
  • Purple flowers, gold brads, thin black ribbon, black gems, gold metallic calligraphy pen, heart dangle and jump ring


Friday, January 18, 2013

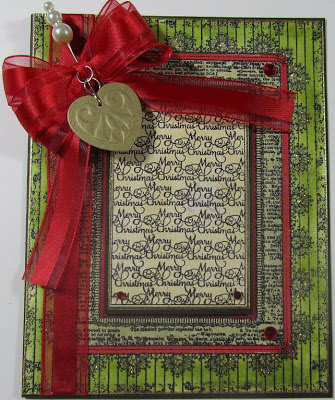
Christmas card- Just Rite's Merry Christmas Background Stamp

Happy Friday!

The recent snowfall put me in the Christmas spirit.  I know, I know...it is January 18th but there is nothing wrong with having spirit all year long!

Over the holidays I picked up the Just Rite Merry Christmas Background Stamp (CL-03865).  I have to give Just Rite credit: their Christmas background stamps are so well designed that you would not require special Christmas paper to make a card.  A little bit of ink, ribbon, Stickles and gems and *voila!* you have a card.


Materials and tools used:
-Just Rite Merry Christmas background Stamp (CL-03865)
-Tim Holtz distress inks Peeled Paint, Old Paper, Antique Linen
-Just Rite Vintage Labels and Banner Dies (heart die)
-Red ribbon
-Stickles Crystal
-straight pin with pearls
-three jump rings
-copic marker cadmium red (R27)
-white, black, gold paper
-black ink and embossing powder
-red gems

Method: I stamped the background twice on white cardstock and embossed. The center of one of the images was cut out, placed on black cardstock. The center of the stamps I rubbed antique linen ink, the next area out was old paper, then peeled paint. Copic ink was used on the borders as shown. I applied glitter on the lace trim on the background stamp. The ribbon and bow were assembled then the middle "cutout" stamped image- which was elevated with foam tape. The heart die was used with gold paper.  Gems were added to the corners and then the heart with three jump rings and the straight pin were attached to the bow. Stickles was applied to one of the "Merry Christmas" areas. I let it set for a few minutes then wiped it away...the antique linen distress ink was removed in that area and that particular Merry Christmas stands out from the rest.

It looks like a lot of steps but it is not as time consuming as you would think!

Have a great weekend! 

Thursday, January 17, 2013

Retro "You're My Favorite Thing" card

Ah, retro.  It takes you back to grandma's kitchen, your great aunt's get togethers, Mad Men...

Retro cards are so enjoyable to make, give and receive. Here is one that I enjoyed making. It took a little bit of time to figure out the layout and how to make it look retro but I am happy with the final results.

Two stamps were used: Hero Arts Teatime Silhouette (F5408) and Michael's stamp "You're My Favorite Thing". Standard white card stock was used for the card, as was shimmery bluish green paper, gold paper, black cardstock (behind the silhouette) and DCWV's Mariposa on the front. The gold paper was embossed with Cuttlebug's Swiss Dots. Black rick rack (too fun!) was applied to add even more retro feel. Black gems in three sizes were angled towards the stamp for focus.  For a bit of sass, I placed a metal gold pin as the "i" dot in favorite.

Enjoy the card...

Wednesday, January 16, 2013

Quick and easy rose thank you card

A new stamp has been added to the collection: Inkadinkado's Rose Flowers Photo #60-00612. Talk about a beautiful stamp! I had to use it right away but lacked a lot of time so I made this Many Thanks card. I stamped the roses on plain ivory card stock with Versafine's Crimson Red ink. After it dried I applied pink chalk across the entire image and spritzed it with gold glimmer spray. The background sheet is from Prima's Madeline 6x6 paper pad and I embossed it with Cuttlebug's roses embossing folder. The tag was made from Spellbinder's Fancy Tag (S4-235), stamped with "Many Thanks", more pink chalk around the edge, Patina Stickles applied on the ends and two pearls adhered on either side of the text. All of this was assembled on kraft card stock and then a shear bow was placed on the upper right corner of the roses. A quick card but the roses stamp does not make it look so! I will definitely use this stamp again and see what I can do in more time. Oh the possibilities!

Tuesday, January 15, 2013

Brianna's Thank You card

A wonderful friend of mine, Brianna, made a lovely stamp for me.  That's right, she made it and I absolutely love it!  For her thank you card, I made sure that her homemade stamp was accentuated on the front.  Her lovely "Ex Libris" stamp with teapot was stamped twice: once on plain ivory card stock and another time on Cosmo Cricket's Odds and Ends paper.  For the card, I used not only the previously listed paper but also Spellbinders Marvelous Squares S4-383.  Two of the corners were blinged up with black gems and Martha Stewart's Flourish Lace edge punch was used on the bottom edge of the striped paper.  Lovely black flower lace ribbon was the final addition.

I hope I did her stamp justice! 
A close up of the stamped image.

Sunday, January 13, 2013

Spread Your Wings Birthday card

Happy Sunday, All!

The rush of the holidays are over and I finally returned to the craft room.  Since last Thursday I have had time to make three cards (yay!) and I wanted to share the first one.

My friend's birthday is tomorrow so I purchased a Spellbinder for her and made a card.  The Spellbinder is Kaleidoscope S4-207.  This is a nice set (I had purchased the same one for myself last year).  Of course, I had to make her birthday card using the Kaleidoscope set.  Also used were Spellbinders Big Scalloped Circles SM (S4-250), Big Scalloped Ovals SM/LG (S4-251 and S4-252), Just Rite Stampers cling set Spread Your Wings (CL-2170) and My Mind's Eye 6x6 pad Bramble Rose. 


Close up of Just Rite Stamp

Related Posts Plugin for WordPress, Blogger...