Pages

Sunday, March 31, 2013

Chicks Rule- Make It Monday Challenge


Happy Easter, Crafteteers!

The fine folks at the Kraft Journal had another design challenge this week: Chicks Rule.  I was not really sure what to do for the challenge so I did not try any layouts during the week.  Well, an hour ago this idea hit me so I went to my craft room and ran around like a crazy chick trying to make the card.  LOL.  My craft room looks like a chicken coop now.  :)

If you are interested in the other entries, take a peck...oops I mean peek here: http://thekraftjournal.blogspot.ca/2013/03/make-it-monday-with-kraft-outlet-chicks.html

Thanks for stopping by and stay crafty!

Saturday, March 30, 2013

Ex Libris Card- Briana Scott handmade stamp


Hello Crafteteers!

In January I posted a card using an Ex Libris stamp my friend made for me.  Yesterday I made another card using her handmade stamp.  I really love this stamp!  Love the layout and the teapot is perfect as the focal point. The steam coming out of the spout adds energy to the image.  The checkered tablecloth is just too cute with a retro feel.  Did I mention I love this stamp?  

Also used on the card is my new Spellbinders die Fancy Ribbon Threader.  What a great little die!  At first I was not sure if I would use the mini holes to thread the blue strand, but when it was done I realized it totally makes the stamped image pop.  

It is as if the paper was made for this stamp: Bo Bunny's Weekend Market. Ironically, I am seeing my friend today at our local market to give her this card.  She is selling her amazing paintings and stamps at our market now.  Interested in seeing just a glimpse of her work?  Take a minute to go here:  http://www.brianacorrscott.com/brianacorrscott/home.html  It is well worth the trip!


Monday, March 25, 2013

Yee Haw- Paper Crafts Country Fresh Challenge!


Hi Crafteteers!

The Paper Crafts Connection challenge for March was "Country Fresh"...a perfect excuse to use my Graphics 45 paper (French Country) and Craft Lounge's stamp set Bountiful Harvest!

The tractor was stamped on watercolor paper and I used Tim Holtz's Distress Ink dabbers with a wee bit of water to color the image.  The wood frame was made from MME Bramble Rose paper.  Faux nails were made with a black pearl pen.

Thanks for stopping by.  Y'all come back now!

Sunday, March 24, 2013

Wheresoever you go...


Hello Crafteteers!

It has been well over a week since my last blog.  I was so happy that I went through the winter without catching a cold...until this week.  A week without taking Ella for a walk, playing volleyball or ultimate, cleaning the house (yay!) or playing in the craftroom (boo!).  Started to return to semi-normal status yesterday so I puttered in the craftroom for a wee bit.  Playtime involved my new Spellbinders set Timeless Rectangles, Kraft paper and Graphics 45 Birdsong.  The stamp is a fave of mine from Quietfire Design...what a great quote.


Thanks for stopping by and stay crafty.  ;)
 
This card is entered into The Kraft Journal Make It Monday- Favorite Color Challenge:
 
This card uses my favorite color (red) and my two other faves (peeled paint green and black).

Friday, March 15, 2013

Secret Garden and Kraft card


Happy Friday!

Crazy bit of weather here the past 48 hours.  Yesterday was glorious: warm weather, the sun was valiantly shining, birds chirping...spring was in the air.  Then I woke up this morning to winter tapping me on the shoulder and saying "Not yet, Chick.  I still have some stuff up my sleeves."  Snow.  It is not that it is not pretty snow but yesterday was sooooo nice.  I was hoping for another day! 

The spring day made me turn to the Graphic 45 Secret Garden paper again.  I just love this paper.  I cut out this image from one of their 12 x 12 sheets and used the Spellbinders Sun Flower Set Two (S4-158) to embellish.  All of the pretties were mounted on Kraft card stock.  Of course Stickles was used- all the daisy centers- and pearls added a happy, finishing touch or two.


Thanks for stopping by and have a great weekend!

This card is entered into the following challenges:

Simon Says Stamp Choose a sketch: http://simonsaysstampschallenge.blogspot.ca/2013/03/simon-sayschoose-sketch.html

Die Cutting Divas Challenge 106, Green and Gold:  http://diecuttindivas.blogspot.ca/2013/03/challenge-106-green-and-gold.html

The Kraft Outlet's Make It Monday, Lucky Green Challenge: http://thekraftjournal.blogspot.ca/2013/03/make-it-monday-with-kraft-outlet-lucky.html

Sunday {Fun}day Link Party: http://everydayisanoccasion.com/sunday-funday-7/

Crafting Desert Divas Link It Up Party: http://craftindesertdivas.blogspot.ca/2013/03/craft-it-up-link-it-up-linky-party.html


Wednesday, March 13, 2013

Christmas Card- tis the season :)


Hello Crafteteers!
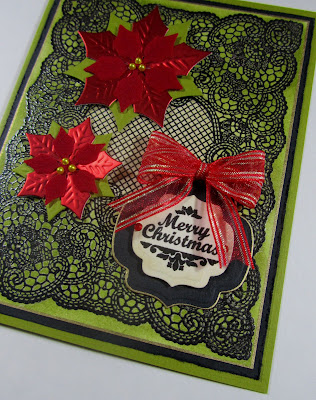
You probably think I am a little nutty for posting a Christmas card...but there is a good reason for this post.  Cardz TV is hosting a new challenge -"It's so you"- which challenges crafteteers to make a card using their favorite colors.  Right away I thought of this card.  It uses three of my favorite colors: black, red and peeled paint.  I cannot count how many of these cards I made before Christmas last year.  It seemed obvious to me to post my favorite card using my favorite colors and one of my favorite stamps (JustRite Lace Background stamp)...
I also thought I would share some of the steps to this card.  It took a wee bit of time to design the card so I may as well pay some of the tips forward.  :)
First, I stamped the lace background stamp on ivory card stock.  The stamped image was heat embossed.


The paper was cut close to the stamped image.  Then I applied antique linen distress ink to the inside of the stamp.  Peeled paint was applied liberally to the rest of the paper.  I then sprayed it with gold glitz and used a gold calligrapher along the four edges.


Next I cut black card stock 1/4" larger than the lace paper.  I ran the paper through my Cuttlebug using two Spellbinders Labels Nine.  This was done to reduce the amount of black card stock needed to make several cards.  The gold calligraphy pen was used along the edges of the labels and I used my distresser on the black rectangular cutout.  (The larger black label was used on the inside of the card.)


For the remainder of the card:

Two ivory labels were cut- one for the outside and one for the inside.  JustRite Vintage Labels One sentiment "Merry Christmas" was embossed onto the label and antique linen was applied to the edges.  Two red gems were added. 

Recollections green paper (almost the exact match to peeled paint!) was die cut using Spellbinders Poinsettia dies.  Red metallic paper poinsettias were cut and then I cut the smaller poinsettias from velvet ribbon (a lot less expensive than velvet paper!).  Three white pearls were colored with a copic and applied to the center of the poinsettias as shown.


This card was so fun to make before Christmas...and I enjoyed making it again this week!  Perhaps I will have to make a similar spring card soon using the same stamp and layout.  :)


This card is entered into the Cardz TV "It's SO YOU" Challenge: http://www.littlescrappieces.blogspot.ca/2013/03/cardz-tv-its-so-you-challenge-26.html


Thanks for stopping by!  Stay crafty.  ;)


Ribbon storage


Hello Crafteteers!

I am very lucky to have a craft room.  In my craft room I do card making, scrapbooking, beadwork, knitting, crocheting, drawing and a wee bit of sewing.  That is a lot of stuff in a tiny room so obviously storage is an ongoing problem. 

My wonderful husband has done some improvements to the room which has helped a lot.  Ribbon was still a problem...until last weekend.  I found an over the door shoe rack that uses rods to support the shoes.  The rods work very well to hold most of my ribbon.  What a great storage saver- I was able to take 7 photo boxes out of my craft room!!!

View of ribbon holder and shelves my hubby made for my wood stamps
The shoe rack is made by Whitmor, part number 6486-1746.  I purchased it at Winners but I it also on Amazon (http://www.amazon.com/Whitmor-6486-1746-WHT-Over-The-Door-White-36-Pair/dp/B0019FOUQ0).   If you notice, there are two columns of rods in the Amazon ad- I removed the front set of rods for three reasons (1) reduce the weight of the unit (2) reduce the stress on the over the door brackets (3) reduce the amount of space the whole unit takes- I did not want the ribbon knocking over my stamps.
 
Thanks for stopping by and stay crafty!  :)


Tuesday, March 12, 2013

My Friends Are Crafty

Hello Crafteteers!

Another blog entry where I get to show off my friends' creative cards.  Our little group met again for a card making session and it was too fun!  An added bonus: Val made a chocolate cherry dessert that was delicious...I am salivating now just thinking of that dessert...

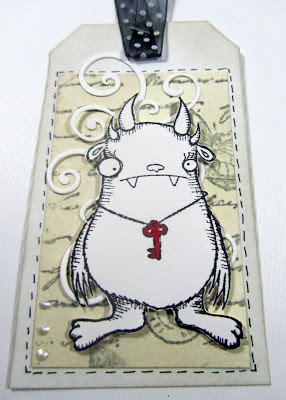
First up was our Crafter Extraordinaire, Val.  She had designed this cute-as-a-button tag for us.  When I first saw the tag I laughed because I thought "That is how I feel that I look some mornings".  As you guessed, I just love the little monster stamp!  It was originally a "he" but a few eyelashes later and "she" was on our card.  The background was made using white tissue paper, stamped with sentiment and place on card stock.  We used distress ink along the edges.


If you like the stamp (I know I do!) then hop on over to Stampotique (http://www.stampotique.com/) to buy one monster stamp...or two...or three...

Our Gamsol Gal was next: Janice.  She designed this lovely Easter card.  The colors are too pretty and the layout is happy.  The little chick and egg paper is so sweet. (Mental note, add "little chick paper" to my wish list.)  I am really digging the pastel colors...and she is totally rocking the pastels on this card!  The bow and the pearls finished off the card perfectly.


Last- but surely not least- was our Design Diva, Rebecca.  She designed a beautiful flower sentiments card.  She chose two different card colors (you clever girl!) and we could either stamp the sentiment on a label (as shown on the yellow card) or directly on the background paper.  I chose to keep the blue card sentiment free for now.  When I need a last minute card I can go to the blue card and stamp the appropriate sentiment on it.  I really like how she layered the flowers on top of the ornate dies and the Martha Stewart punched branches.  Did I mention yet she was clever?


Thanks again Ladies for a fantastic crafting session!  Can't wait until the next one!

If you do not have a little crafty card design group, I highly suggest you create one or find one. It is fun to craft all afternoon, do new techniques, see new crafting styles, and hang out with fellow Crafteteers.  Plus, it is nice to have some extra cards in our card stash to give out!  See my original crafty friends post (http://daisysanddaffodils.blogspot.ca/2013/01/my-friends-are-crafty.html) to see how we have our card making session set up.

Interested in seeing my friends' other paper crafts?
Valerie: http://valeriewilson.blogspot.com/

Thanks for stopping by and stay crafty!


Monday, March 11, 2013

Secret Garden card


Hello Crafteteers!

To celebrate the spring ahead and the awesome weather, I made a card using Graphic 45's Secret Garden paper.  The paper is so beautiful!  I usually do not use pastels but this paper lured me in.


Thanks for stopping by! Have a great Monday and stay crafty!
 
This card is entered into Sentimental Sundays Challenge #145: 3 embellishments that start with "B".  The card has a bow, button and a brad.  Contest link: http://sentimentalsundays.blogspot.ca/2013/03/challenge-145-3-embellishments-that.html


Saturday, March 9, 2013

JustRite Challenge #92- Make It Pop!


Hello Crafteteers!

JustRite has a new Friday Challenge: Make It Pop!  The card not only has to be elevated but must also be a birthday card.  I cannot think of a better gift than a friend so for the card I used JustRite cling stamp "Special Gifts" from their Special Labels Twenty-Nine set CR-04350.  The paper is from my new paper pad Come Away With Me from My Mind's Eye.


The center was elevated with four strips of foam tape and the tall flowers surround one end of the lacy oval.  The center definitely pops off the surface of the card and the triple bow with butterfly fabric button completes the layout.

Stop by the JustRite site to check out the other Make It Pop cards...it is worth the trip!  http://justritestampers.typepad.com/justrite-inspiration/2013/03/justrite-friday-challenge-092-make-it-pop.html

Thanks for stopping by and stay crafty!  :)


Friday, March 8, 2013

Quietfire Design Thank You card

 
Hello Crafteteers!

It has been over a week since my last blog...call me a slacker!

Yesterday was a great day: I received my winning stamps from Quietfire Design.  Woo-who!  You should have seen me by the mailbox: I was so happy it took all I had not to do a dance. 

One of the stamps in the package was this lovely Thank You stamp.  It seemed appropriate to make a thank you card for everyone that voted for me and for Quietfire Design who kindly give all of their awesome stamps to me.  Can't wait to use the rest of the stamps!  :)


Thanks again for your votes, to Quietfire for the stamps and for stopping by!

Have a good weekend and stay crafty...

If you are interested in seeing more Quietfire stamps, go here (http://www.quietfiredesign.ca/home.php?cat=115).  You will be happy you did!  Plus, their Spellbinder selection is fantastic!
Related Posts Plugin for WordPress, Blogger...