Pages

Monday, June 25, 2018

Happy Birthday Balloon cards

Hello Crafty Friends!

It was my turn to share a project at Elizabeth Craft Designs and I created a stack of Happy Birthday Balloon cards.  My favorite card is shown above- not only does it look cool, but it is inexpensive to make.  No vellum used!  I created a video showing all of the cards and how to make the above card.


For more photos and instructions, feel free to hop on over to the Elizabeth Craft Designs blog post.  :)

Thank you for stopping by!
Big Crafty Hugs,
Kathy Jo

Sunday, June 24, 2018

Giveaway reminder!

Hello Crafty Friends!

Just a reminder that Monday June 25 at midnight (Pacific) is the deadline to enter to win the $35 gift certificate from Quietfire Design!  Entry is easy: leave a comment on the Wedding Weekend posts (comment on both days for two entries) and a bonus entry to if you follow Quietfire Design on Instagram.

Good luck!!!

Have a happy, crafty day!
Big Hugs,
Kathy Jo

Saturday, June 23, 2018

Wedding Weekend and GIVEAWAY!!!


Hello Crafty Friends!

It is a special weekend at Quietfire Creations...it is Wedding Weekend!  On Saturday and Sunday I will be sharing wedding projects- photos and videos- using the newly released dies and stamps from Quietfire Design.  And guess what?  There is a giveaway, too!  Woo-who!!!  One lucky crafter will win a $35 gift certificate to the Quietfire Design store!

Hope on over to today's post to see the projects and enter into the draw.

Hope you enjoy the projects!  Good luck on the draw!!!

Have a happy, crafty day.
Big Hugs,
Kathy Jo

Friday, June 15, 2018

"Little One" Baby card

Hello Crafty Friends!

It is my day to share at Quietfire Creations and I made a card using the newly released die set Little Ones:
Little Ones - 7 Metal Cutting Dies
...and stamp set, Welcome Little One:
Welcome Little One Collection - Clear Stamps
The feet die is too sticking cute!  And the heart created in the center is adorable:
Feel free to hop on over to the Quietfire Creations blog for more info.  :)

Product used:
Little One die set
Welcome Little One stamp set
Cotillion die set by Becca Feeken for Spellbinders 
Dotted Scallop Ovals by Elizabeth Craft Designs
Lawn Fawn Perfectly Plaid paper

Have a happy, crafty day!
Big Hugs,
Kathy Jo

Tuesday, June 12, 2018

"Thank you" single stem rose

Hello Crafty Friends!

On Sunday I walked into my craft room and was overwhelmed with my mess!  I am not an organized crafter and it was really showing.  I started with cleaning up my workspace...until I noticed how well some die cuts looked together.  Hmm.  Will this project wait or should I continue cleaning?  Inspiration called so I hung up on Cleaning.  :)

The card used two new Elizabeth Craft Designs die sets: Thank you 2 and Stem Rose.  I had run the rose die using scrap pink metallic card stock.  It is pretty with the red outline die cut on top.  The stem was used to die cut green card stock and darker green ink applied.
A scrap piece of watercolor paper was cut to size and distress ink added along the edges.  It was mounted on vintage looking dark ivory card stock.
It is a simple card but has a lovely vintage style.  The calligraphy "thank you" is a focal point and is beautiful.

Thanks for stopping by!  I must return to cleaning the craft room...wait...what is that?  That ribbon would look perfect with that die...

:)

Hugs,
Kathy Jo

Product used:
Thank you 2 die set
Stem rose die set


Saturday, June 9, 2018

A look at the new releases from Elizabeth Craft Designs


Hello Crafty Friends!

Today's post is a special one as it shares a glimpse at all of the newly released product designed by Suzanne Cannon for Elizabeth Craft Designs.  As I mentioned earlier this week, the release is huge!  I thought I would provide glimpses of all of the release and some crafty comments.

A couple of cards this week were baby based.  Yes, Suzanne designed some adorable dies that would be so sweet on your next crafty project.  The Little Ones die set has the cutest dies that would be great on cards, scrapbook pages or a happy photo frame:

Little Ones - 7 Metal Cutting Dies
This project used the sweet little carriage.  It is a gift card holder on one side and the adorable carriage on the other side:

Special Delivery is another sweet baby die set.  It goes so well with the baby carriage from Little Ones.
Special Delivery Day - Metal Cutting Dies
Here is a project I shared earlier this week using the die set:

Of course, you can't think about wee ones without thinking about baby Cuddles...Cuddles - Metal Cutting Die
...or watching them sleep.  The Flourished Night Sky would be perfect for all of those photographed naps!
Flourished Night Sky - Metal Cutting Dies
The Welcome Little One stamp set is full of wonderful stamps...
Welcome Little One Collection - Clear Stamps
...and is perfect with the Welcome die.
Welcome - Metal Cutting Die


I was very excited to see the Gable Box die!  This die is awesome!  And it fits on a Cuttlebug plate, too.
Gable Box - Metal Cutting Die
You know what works well with the Gable Box die?  The Heart & Pawprints Sprays die set.  This set is the bee's knees and looks very cool when used on the box.  
Hearts & Pawprints Sprays - 2 Metal Cutting Dies
A project using the Hearts spray:

A crafty note: the Gable box and Heart spray makes a perfect wedding favor box!

Talking about weddings, Suzanne designed several dies for weddings, wedding cards and creating wedding memories.  (I have a special two day wedding post next weekend...stay tuned!)
Save the Date is gorgeous:
Save the Date - Metal Cutting Die
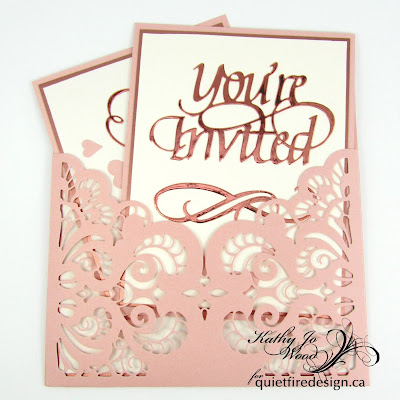
You're invited is beautiful for a wedding invite:
You're Invited - Metal Cutting Die
The You're Invited is not just for weddings.  Here is a baby shower card:

Of course there is an RSVP!  Loving the wee heart!
RSVP - Metal Cutting Dies
Eat Drink & Be Merry would look awesome in a table centerpiece!
Eat Drink & Be Merry - Metal Cutting Dies
Menu cards would be a nice touch and would share the meal plans for guests:
Menu - Metal Cutting Die
Imagine having a photo of the happy couple with Once Upon a Time next to it.  
Once Upon A Time - Metal Cutting Die
Nothing shows your appreciation more than a handmade thank you card using the exquisite Thank You 2 on the card front:
Thank You 2 - Metal Cutting Die
A card using the die set:

Would you like to have some stunning calligraphy on the inside of your invites?  There are coordinating stamp sets, too!
Please Join Us Collection - Clear Stamps
Dates are helpful, too!  :) 
Months & Numbers Collection - Clear Stamps
Interested in celebrating other events?  How about a birthday?  The Big Balloon die is too fun!
Big Balloon - Metal Cutting Dies
Get a load of the oh-so-fun Happy Birthday die set!  The "happy" makes me..um...happy.  :)
Happy Birthday 3 - Metal Cutting Dies
You can't have a birthday without making a wish!  The detail of the star as the dot above the "i" is so clever.  Great little detail!  I can see this used on many birthday scrapbook pages!
Make a Wish - Metal Cutting Dies
Attending a surprise party, scrapbooking a surprise party or sending a surprise birthday gift?  The Surprise die is a must have for you!
Surprise! - Metal Cutting Die

Do you want to send a thoughtful card to someone not easy to visit?  The Miss You die and Long Stem Rose would create a heartfelt card front:
Miss You - Metal Cutting Die
The Long Stem Rose creates a lovely layered die rose:
Long Stem Rose - Metal Cutting Dies
And there is a Rosebud Wreath, too!  The rosebud wreath is a large die and would be stunning on a scrapbook page!
Rosebud Wreath & Elements - Metal Cutting Dies

Holy smokes!  Told you it was a huge release!


What are your favorites?  Are there any on your wish list?  Or must have list?  

Stay tuned!  More projects will be shared using the product.  Yes, I see a lot more happy, crafty hours in my crafty room!

Thank you for stopping by and going through the new release!

Have a happy, crafty day!
Big Hugs,
Kathy Jo

Thursday, June 7, 2018

NEW RELEASE! Elizabeth Craft Designs "Thank you"

Hello Sweet Crafty Friends!
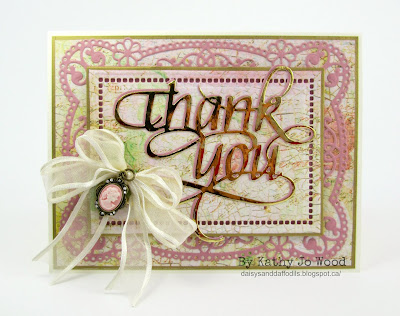
It has been a busy week here at I’m a Little Teapot sharing projects using Newly Released product from Elizabeth Craft Designs.  Let’s keep the fun times rolling with another project using a newly released die: Thank You 2.
 Thank You 2 - Metal Cutting Die
I like this die- not only because of the curvaceous calligraphy- but the size.  It fits many of my smaller card dies which means that I can have it framed on a smaller card.  Isn’t it just lovely inside the framed die cut?
Card instructions:
1.       Create top fold card using white card stock.
2.       Cut and mat patterned paper to card front.  (I also applied gold marker to the mat edges.)
3.       Die cut pink card stock using Tallulah Frill Lace Frame die.  Mount to card front.
4.       Die cut patterned paper using Hemstitch Rectangle die.  (I also applied gold marker to edges.)  Mount to card front using double faced foam tape.
5.       Die cut pink and gold card stock using Thank You 2 die.  Offset mount to card front using liquid adhesive.
6.       Create double bow and mount to front using liquid adhesive.  Mount embellishment to bow center.
The romantic and vintage layers look fabulous as the frame for the gorgeous Thank You die cut.

Product Used:

Thank You 2 die set by Suzanne Cannon for Elizabeth Craft Designs
Hemstitch Rectangles and Tallulah Frill Lace Frame dies by Becca Feeken for Spellbinders

Thank you for stopping by!  I do hope that you enjoyed this project using another one of the new releases!

Big Hugs,
Kathy Jo

Wednesday, June 6, 2018

New Elizabeth Craft Design Release! Special Delivery

Happy Hellos to my Crafty Friends!

It is Day 3 of sharing projects using the newly released Elizabeth Craft Designs product designed by Suzanne Cannon.  Hope you have enjoyed the previous two posted projects.
Today’s project is continuing on the baby theme.  The project is a sweet gift card or money holder for the soon-to-be parents on your gift giving list.  The outside has the timelessly beautiful “Special Delivery” calligraphy
…the inside has a wee carriage on one side and the gift pocket on the other side.
Let’s dive in to the instructions!
Card Instructions:
1.       Cut card stock to 5” x 11”.
2.       Score at 4 3/8” and 8 3/4”.  Fold both scores in.
3.       Adhere tape (to the shorter sides only) on the pocket.
     4. Mat dark ivory card stock to left side of card.  Die cut baby carriage using desired coordinating papers.  Mount to ivory mat.

   5. Cut and mat desired paper to pocket.
   6. Cut and mat dark ivory card stock to front of card.
   7. Use Special Delivery die set to cut white card stock and pink copper card stock.  Offset mount to front of card using liquid adhesive.
   8.  Use liquid adhesive to adhere wee hearts as shown.

The end result is a very special card for that will be cherished by the recipient.

Product used:
Gingham paper, pink copper paper and white card stock

Thanks for stopping by!  And stay tuned as there are more new release projects that will be shared soon!
Big Hugs,
Kathy Jo


Related Posts Plugin for WordPress, Blogger...